Pages

Sunday, September 30, 2012

Website Review: Coastal.com

I've been in the market for some new glasses for about a year.  I'm normally a contact lens wearer, relegating my glasses to weekends and sick days, but there are some days when I just want a different look, or to take a break from my contacts. It's been 5 years since I last got new glasses, so it was time for a refresh.

But I didn't know where to begin.  Glasses are really expensive - the frames are not cheap, and then when you add in all the extras - the extra thin lenses for my extra big prescription, or the special coatings and polishing, well, the dollar signs add up.  And because I don't wear them every day, it felt like an indulgence I just couldn't afford right now.

Sure, I've seen websites where you could order fashionable glasses at lower costs.  But I was nervous!  How could I find a good one if I couldn't try on 400 pairs first?  And what if I ordered a pair and my thick lenses stuck out like wing flaps?  Then someone told me about Coastal.com.  They have a deal where your first order of glasses is free!  What?  Free?  Well, that's a price that can always make me try something new!  Plus their return policy allows you to send back your glasses up to a year later.

First, I perused their website and selected a handful of frames that I liked.  Then, I went to a local store and spent about 15 minutes trying on various frames in different shapes, sizes, and colors.  I also took a good look at my current frames, and used some measurements printed on them (found either on the inside of the frames or on the nose piece) to help guide me.  Once I had an idea of the shape and size I needed - because my face is small and my bridge is narrow - I went back to Coastal and picked my frame.   I input my prescription from my optometrist. I did pay more to order thinner lenses, but the standard lenses are available at no cost.  And I clicked Purchase!  I bought them on a Sunday, and they were at my door on Wednesday when I arrived home from work.

I chose the Havana frame by Kam Dillon.  I know these are a bit big for my face, but I wanted a little bit of a 'dorky'/ studious look.  I also wanted a frame that wasn't too dark or overwhelming.  I really like them!


My total cost was $65 for the thinnest lenses, handling, and taxes.  The frames and shipping were free. The lenses still seem pretty thick, and there was no option to polish the edges, but with this type of plastic frame I wasn't worried about it.  The prescription seems accurate, although I did have about a 2 week adjustment period.  I attribute this to the fact that it was 5 years between updated prescriptions and because I don't wear them all the time.  Glasses and contacts force your eyes to adjust in different ways but now I feel comfortable wearing them and my vision is clear and crisp. I give Coastal.com two thumbs up!

Thursday, September 20, 2012

The William Morris Project: Different Week, Slightly Different Post

I know, it's a stupid title, but given that this week is essentially just a continuation of last week, it's all I have.

From this: 


To this:
(I love it!)


From this: 


To this: 


2 successful projects in 2 weeks.  Slow & steady wins the race, right? 


Thursday, September 13, 2012

The William Morris Project: Lamps, and Plans, and a Little Crafting

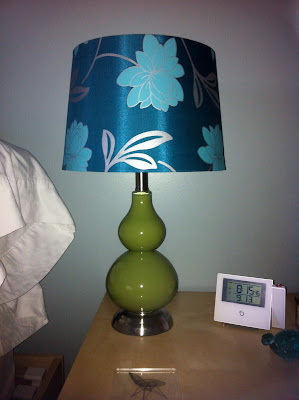
Alrighty.  As usual, Thursday snuck up on me like a Ninja (especially astonishing as I spent most of yesterday resenting the fact that it was only Wednesday, and not Friday).  I haven't done much this week except continue to adjust to the new school/work/activity/homework/husband's crazy schedule.  So yeah.... I don't have a real "project" to share for this week.  But a few weeks ago I bought these hideous lamps, and I DO have plans for them.


I have needed bedside lamps for ages.  But I am tainted by the internet.  I see so many Goodwill transformations and DIY tweaks that I have a warped sense of what I should be able to do with the things around me.  I should be able to jaunt into the local Goodwill, pick up a matching yet horrendously ugly set of lamps priced at $2.71 each, and with a swath of spray paint and a few yards of ribbon, turn them into the lamps of my dreams.  And yet, our Goodwill is AWFUL, and the few lamps I already own are just not right for use next to the bed.  So when I happened upon these hideous beauties at Lowe's a few weeks, it was hard to pass up what was essentially a 2-for-$20 deal.  Yes, they were even a mix-and-match pair, so I consciously chose the green base and blue shade.

I know.

But I don't hate the shades, even though they clash a little (lot) with our blue/grey/greenish walls.  I plan to spray the bases white and call it good.  For now, they live in the realm of the functional.


And then there's this:


After spending months pinning yarn wreaths, I got off (or really, I got ON) my duff and made one.  Or most of one.  Accoutrements are still in progress. 

Have you made a yarn wreath?  If not, let me give you a few tips. 
  1. It doesn't take as much yarn as you think.  I have about a half skein left. 
  2. I used a straw wreath WITH the plastic on.  I also like the look of the squared foam wreaths.  It really does need a smooth surface to work best.  
  3. It is a BORING process.  I wrapped off and on for about 4 hours.  I'd do a section, then walk away to do something else for a while.  If you want to power through it, pop in a movie and settle in for some boredom.  I also found that sitting on the floor with the wreath held between my knees was the perfect way to keep both hands free and keep the wreath in place.  A little hard on the back, but very efficient. 
  4. It takes some zhusshing to get it right.  I'd wrap it 4 or 5 times, then work the strands into place, smoothing and tightening.  
  5. I don't ever work with yarn, so I wasn't sure where to start with it.  I worried that I was supposed to do something else with the yarn before wrapping, like re-wrap it into a pretty ball or something, but no, I just pulled out an end and went to town. 

 A few more felt flowers, and I'll have a pretty Fall wreath to go on my beautiful blue door!


This post is part of the weekly William Morris Project, a la Pancakes and French Fries


Saturday, September 8, 2012

Pie Party

I'm part of a Recipe Club/ Cooking Club through church.  
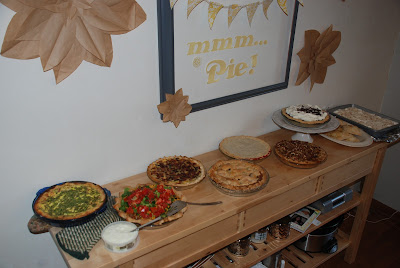
Each month, we choose a different theme, then meet on a specific evening to share our dishes and to visit.  For August, the theme was "Pie", and we met at my house!  This was good for a number of reasons.  First, I love pie (really, who doesn't?).  Second, I am an introvert, but I like the idea of people gathering at my house.  


Because it was an insanely busy week, I had to plan carefully to get everything done.  I started the pie crust the night before, but didn't *quite* understand how long it would take to get everything done (the freezing and blind baking add tons of time to the process, but were WELL worth it).  I woke up at 5am the day of the party so I could get it all done before school, work, house cleaning, and soccer practice.  I made Peach Hand Pies (on the oval platter above), Chocolate Pudding Pie (on the cake stand), and a Leek, Mushroom, Bacon quiche (not pictured).  

Everything was so good!  We had Taco Pie, 3 kinds of quiche, Apple Pie, Cherry Pie, Apple Pie with Pecan Crumb Topping and Caramel Sauce, Chocolate Pudding Pie, Peach Hand Pies, and a Gluten-Free Coconut Cream Pie.  

I also used these recipes, but made some changes: Quiche Me DeadlyBourbon Peach Hand Pies.  

Have you ever had a Pie Party?

Thursday, September 6, 2012

The William Morris Project: Living Room

 Let's take a trip down memory lane, shall we? 

When we bought this house a year ago, this is what the front room and hallway looked like.  


Relatively innocuous.... but not good.  The walls were streaked with dirt where pets had rubbed against them.  The paint was a sad grey-green, which was repeated throughout the house.  And the wallpaper border just screamed "1990's!".  


We don't have furniture for this room, so even though it's been used as a play space, craft room, dumping ground, and storage locker, it hasn't been given any love. 

After 8 months went by, I decided to strip the wallpaper.  The wallpaper in the kitchen had come off in sheets, so I thought this would be no different.  I quickly discovered that the border had been applied over primed drywall..... and I think they used E-6000 instead of wallpaper paste.  After it took me 2+ hours to strip 5 feet, I had to rethink my approach.  


A few more months went by, and I finally rented a wallpaper steamer and got down to business.  2 hours later, the walls were de-papered.  There was so much damage where I had originally stripped the border that I had to skim coat the entire top 2 feet of wall, then prime it, then wipe down the walls to remove some of the nasty dirt.  FINALLY I was ready to paint.  

And now, it's lovely! 

I chose Creamy Mushroom by Behr (hard to tell, but it's a very light tan), and had it mixed in my favorite Behr Premium Plus Ultra in a Satin finish.  I actually had to use 2 gallons, because I painted the inside of the closet too (amazing how much extra space & time that tacks on to a project).   


I know, it's not an exciting color.... more the wall equivalent of khaki pants.... but it's clean, and light, and the newly white trim just glows.  As we do for each room we paint, we also replaced all the light switches and outlets with white toggle switches and white square outlets.


I like how the blue door plays off the brown, and I plan to paint the back of the door a deep chocolate brown for more contrast.  


I'm down to just 3 more painting projects.  I might even be done before Christmas! 

This post is part of The William Morris Project via Pancakes and French Fries.  


Tuesday, September 4, 2012

Summer, Where Did You Go?

Maybe a better title is "August, Where Did You Go?"  I cannot believe that it is September. And that Autumn will be here in 3 short weeks.  I am more than ready for some cooler weather and snuggly sweaters, aren't you?

Because it has been weeks since I blogged, here is recap of August:

Husband left to work an hour and a half away, for the entire month.  He only had one day off each week, and the first week he actually had my birthday off!  Hooray!  And then he had to trade it for a Saturday off so he could do a team-building activity with the other Residents.  Boo!  But my birthday was still nice - very low key, and I spent some quality time with 2 of my 3 favorite people.


Birthday Roses


Birthday Girl

This is just a silly picture of J, who fell asleep in Panera immediately after finishing his dinner. 
He's only ever done that once before.  


New favorite food: Bolthouse Farms Yogurt Ranch Dressing.  
2Tbs = 45 calories of yumminess.
Find it in the refrigerated salad section of your local Walmart. 


My Mom came to visit for 2 weeks, and I didn't get a single picture!   But the kids had loads of fun spending time with her, and doing crafts together.  We have many new masterpieces in the house.  

J was invited to a Superhero party for his buddy next door.  The party included a sweet backyard obstacle course, which the kids repeated 425 times.  


Check out those muscles!


At the end there was cake AND s'mores.  
Superheroes have to keep up their strength.


After fulfilling her part of our beginning of summer bargain (pass the swim test at the pool & you can get your ears pierced), we visited the mall and had the deed done.  

She was ready, but I think it still hurt a little more than she anticipated. 


And then my girl started 3rd grade!  We were all ready for that to happen. 


"Mom.... I'm getting tired of all the pictures...."


And finally, I found this gem on my phone this morning.  Looks like I need to be a little more careful where I leave it lying around.  


Are you sad to see summer go?  Are you ready for fall?